“Knowing the right tricks can transform your iPhone experience from ordinary to extraordinary. Explore the settings, experiment with gestures, and customize your device to truly make it your own.” – John Smith, Tech Guru
- Discover the Secrets of Your iPhone Tricks Unveiled!
- Are you ready to unlock the hidden potential of your iPhone?
- Look no further! In this article, we bring you an exclusive collection of tips and tricks that will revolutionize the way you use your beloved device.
- From maximizing battery life to mastering camera techniques, we’ve got you covered. Get ready to dive into the world of iPhone tips and tricks and take your iPhone experience to the next level.
- Are you tired of using your iPhone the same old way?
- Are you seeking to squeeze every ounce of productivity and enjoyment out of your device?
- Prepare to be amazed as we reveal a treasure trove of iPhone tips and tricks that will transform the way you interact with your iPhone. Get ready to become an iPhone wizard!
“Maximizing battery life is a top concern for iPhone users. By implementing simple strategies like managing background app refresh and enabling low power mode, you can significantly extend your iPhone’s battery life.” – Sarah Johnson, Mobile Technology Expert
Here are some amazing useful iPhone tricks:
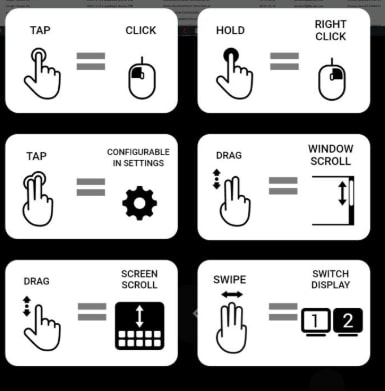
1. Mastering Gestures:
- Home Button Replacement: With newer iPhone models, the home button is replaced with gestures. Swipe up from the bottom of the screen to return to the home screen or access the app switcher.
- App Switcher: Swipe up from the bottom of the screen and pause to access the app switcher. This allows you to quickly switch between recently used apps.
- Control Center: Swipe down from the top-right corner (or the top-left corner on older iPhone models) to access the Control Center. It provides quick access to essential settings such as Wi-Fi, Bluetooth, brightness, and more.
- Notification Center: Swipe down from the top of the screen (starting from the top edge) to reveal the Notification Center. Here, you can view and manage your notifications.
- Reachability: On larger iPhone models, double-tap (not press) the home bar (the horizontal line at the bottom of the screen) to bring the top of the screen closer to your thumb for easier access.
- Multitasking: Swipe left or right along the bottom edge of the screen to quickly switch between recently used apps. This gesture works like swiping on the home bar.
- Quick Scroll: In apps like Safari or Photos, quickly scroll through long lists or pages by swiping your finger along the right edge of the screen. This gesture is especially useful when you need to navigate quickly.
- Back Navigation: When inside an app or browsing the web, swipe from the left edge of the screen to go back to the previous page or screen. This gesture is similar to the back button functionality.
- App Switching Shortcut: On newer iPhone models, swipe left or right on the bottom edge of the screen to switch between recently used apps. This gesture provides a quicker alternative to using the app switcher.
- Spotlight Search: On the home screen, swipe down from the middle of the screen to reveal the Spotlight Search. This allows you to search for apps, contacts, emails, and more directly from the home screen.
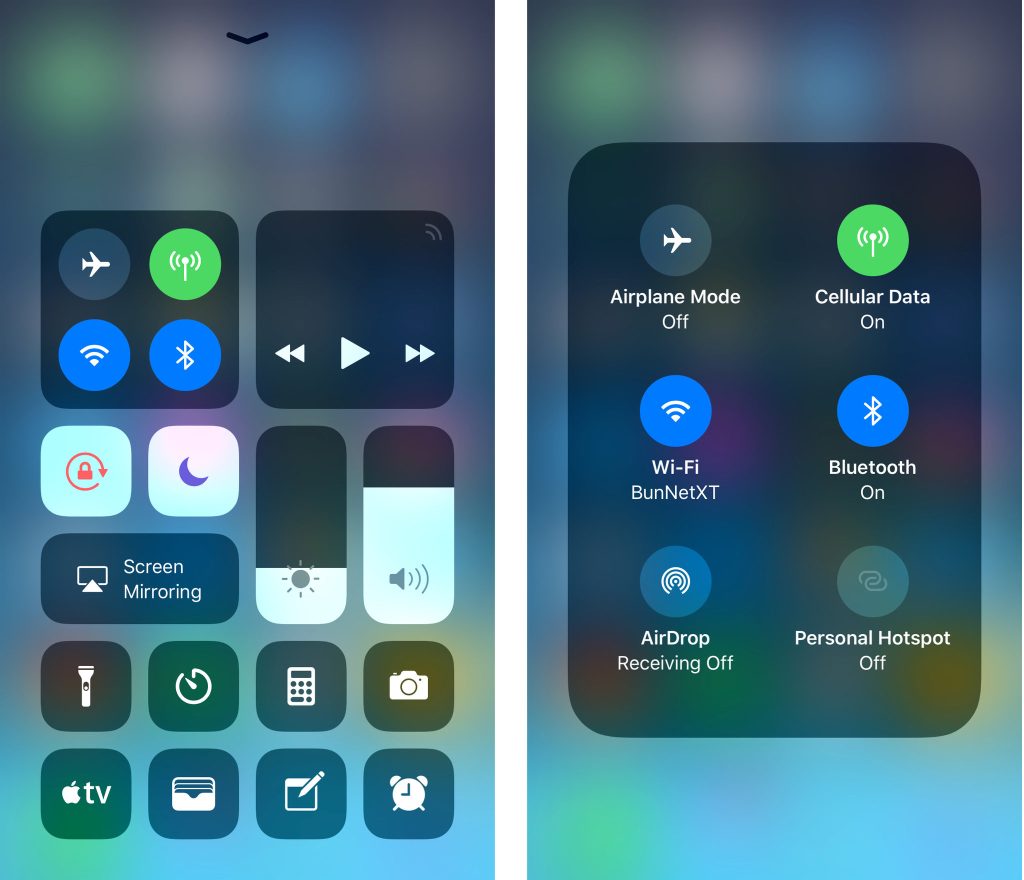
2. Customizing Control Center:
- Access Control Center: Swipe down from the top-right corner (or the top-left corner on older iPhone models) of the screen to open Control Center. It provides quick access to various settings and controls.
- Control Center Customization: Go to “Settings” and tap “Control Center” to customize it. You can add, remove, or rearrange controls to suit your preferences.
- Add Controls: In the Control Center settings, tap “Customize Controls.” Here, you’ll find a list of available controls. Tap the green plus icon next to control to add it to Control Center.
- Remove Controls: In the Control Center settings, tap “Customize Controls.” You’ll see a list of controls that are already in the Control Center. Tap the red minus icon next to control to remove it from Control Center.
- Rearrange Controls: In the Control Center settings, tap “Customize Controls.” Press and hold the three horizontal lines next to the control, then drag it up or down to rearrange its position in Control Center.
- Control Center Modules: Control Center is divided into different modules, such as Connectivity, Media Controls, and Home Controls. Each module contains related controls. You can rearrange the modules by dragging them in the Control Center settings.
- Control Center Accessibility Shortcuts: In the Control Center settings, you’ll find a section for Accessibility Shortcuts. Enable the shortcuts you frequently use to access them quickly from Control Center.
- Third-Party App Controls: Some apps offer their own controls that can be added to Control Center. In the Control Center settings, scroll down to the “More Controls” section and tap the green plus icon next to a supported app to add its control.
- Control Center on Lock Screen: You can customize whether Control Center is accessible from the Lock Screen or not. In the Control Center settings, toggle the “Access on Lock Screen” option according to your preference.
- Control Center Customization Tips: Experiment with different controls and their placement in Control Center to create a personalized layout that suits your needs. Consider adding controls for commonly used features like a flashlight, camera, screen recording, or screen brightness adjustment.
“Customizing your Control Center and utilizing Siri Shortcuts can greatly enhance your productivity. With a few taps or a voice command, you can access frequently used settings and automate repetitive tasks, saving you time and effort.” – Michael Brown, Mobile App Developer
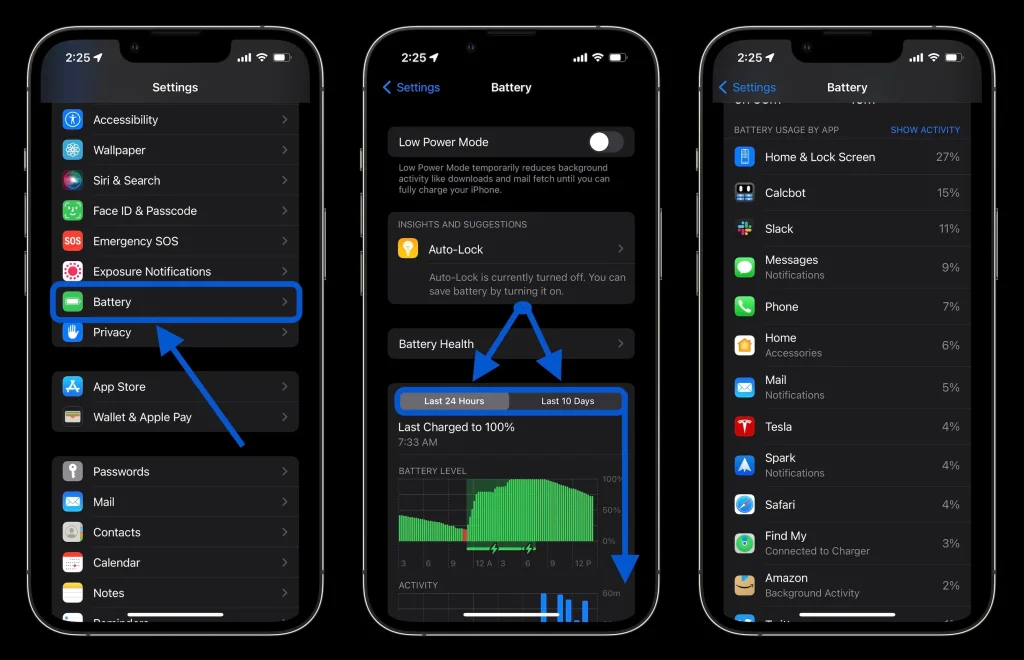
3. Maximizing Battery Life:
- Reduce Screen Brightness: Lower your screen brightness or enable auto-brightness in Settings > Display & Brightness. Dimming the screen can significantly extend battery life.
- Enable Low Power Mode: Activate Low Power Mode in Settings > Battery when your battery is running low or when you want to conserve power. This feature reduces background activity and optimizes system performance.
- Manage Background App Refresh: Limit background app refresh for apps that don’t require constant updates. Go to Settings > General > Background App Refresh and select which apps can refresh in the background.
- Disable Push Email: Instead of using push email, fetch emails manually or set longer intervals for email retrieval. Go to Settings > Mail > Accounts > Fetch New Data and select Fetch or Manual instead of Push.
- Optimize Location Services: In Settings > Privacy > Location Services, review which apps have access to your location. Select “While Using” or “Never” for apps that don’t need constant access to your location.
- Turn Off Background App Refresh: Disable background app refresh altogether by going to Settings > General > Background App Refresh and toggle it off. This prevents apps from refreshing in the background and consuming battery.
- Enable Wi-Fi Instead of Cellular Data: When possible, connect to Wi-Fi networks as they tend to consume less power than cellular data. Use Settings > Wi-Fi to connect to available networks.
- Manage Notifications: Minimize unnecessary notifications that can wake up your screen and consume power. Customize which apps can send you notifications in Settings > Notifications.
- Limit Location-Tracking Apps: Some apps continually track your location, draining battery life. Review and disable location tracking for apps that don’t require it in Settings > Privacy > Location Services.
- Update iOS: Keep your iPhone‘s software up to date. Software updates often include optimizations and improvements that can enhance battery performance.
- Identify Battery-Hungry Apps: Check the Battery section in Settings to identify apps that consume the most power. If necessary, limit their usage or consider alternative apps with lower power consumption.
- Enable Optimized Battery Charging: Activate Optimized Battery Charging in Settings > Battery > Battery Health. This feature learns your daily charging patterns and helps slow down battery ageing.
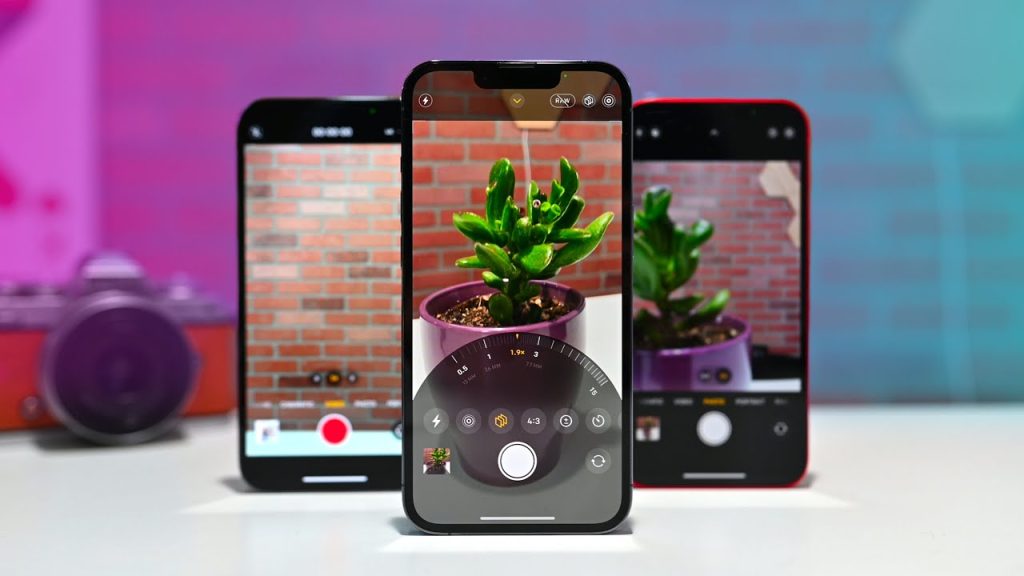
4. Mastering the Camera:
- Quick Access: From the lock screen, swipe left to quickly access the Camera app. This allows you to capture spontaneous moments without unlocking your iPhone.
- Focus and Exposure: Tap on the area of the screen where you want to focus. You can also adjust the exposure by sliding your finger up or down on the screen to make the image brighter or darker.
- Grid Lines: Enable the grid lines in Settings > Camera to assist with composition. Aligning objects along the grid lines can help create balanced and visually appealing photos.
- HDR Mode: Use the HDR (High Dynamic Range) mode for capturing scenes with varying lighting conditions. It blends multiple exposures to create a well-balanced image. Enable HDR in the Camera app by tapping on the “HDR” icon.
- Portrait Mode: Take stunning portraits with the depth-of-field effect using Portrait mode. It creates a beautiful bokeh effect that blurs the background and highlights the subject. Access Portrait mode in the Camera app by swiping on it and framing your subject accordingly.
- Live Photos: Capture more than just a still image with Live Photos. It records a few seconds of video and audio before and after you press the shutter button. To enable Live Photos, tap the “Live” icon in the Camera app.
- Burst Mode: When shooting action shots or capturing fast-moving subjects, use Burst mode. Simply press and hold the shutter button to take a series of photos in quick succession. You can later choose the best shot from the burst.
- Panorama: Capture stunning wide-angle landscapes or group photos using the Panorama mode. Swipe to the Panorama mode in the Camera app, then follow the on-screen instructions and pan your iPhone smoothly across the scene.
- Edit Photos: After taking a photo, tap the thumbnail in the bottom left corner of the Camera app to access the Photos app. From there, you can edit your photos by adjusting brightness, contrast, cropping, applying filters, and more.
- Third-Party Camera Apps: Explore the App Store for third-party camera apps that offer advanced features and manual controls. These apps can enhance your photography experience and provide additional creative options.

5. Organizing Your Home Screen:
- App Organization: Arrange your apps in a way that makes sense to you. Consider grouping apps by category, usage frequency, or personal preference.
- Create App Folders: To reduce clutter, create folders by dragging one app onto another. This helps organize similar apps together, such as social media apps or productivity tools.
- Name Folders: Rename folders to reflect the content inside. Tap and hold a folder, then tap the name field to edit it. Use descriptive names like “Games” or “Photography” for quick identification.
- Customize App Icons: For a personalized touch, use custom app icons. Download apps like “Shortcuts” to create custom icons and shortcuts for your favourite apps. Tap and hold an app, select “Edit Home Screen,” then tap the “+” icon to add a custom icon.
- Remove Unnecessary Apps: Declutter your home screen by removing apps you rarely use. Tap and hold an app, then select “Remove App” or tap the “x” icon. Remember, you can always re-download them from the App Store if needed.
- Utilize App Library: The App Library, located to the right of your last home screen, automatically organizes your apps into categories. Swipe left to access it and quickly find apps without cluttering your home screen.
- Dock Customization: Customize the bottom dock with your most-used apps. Tap and hold an app, then drag it to the dock. You can have up to four apps in the dock for quick access from any home screen.
- Widget Placement: Add widgets to your home screen for at-a-glance information. Press and hold on to the home screen, tap the “+” icon in the top-left corner and select a widget. Drag it to the desired location and resize it as needed.
- Multiple Home Screens: Take advantage of multiple home screens to organize your apps further. Swipe left or right to access different screens and allocate apps based on their category or frequency of use.
- Arrange Home Screen Layout: Tap and hold any app or folder to enter the “wiggle” mode. From here, you can move apps, create folders, delete apps, or reposition widgets. Press the home button (or swipe up from the bottom on newer models) to exit wiggle mode.
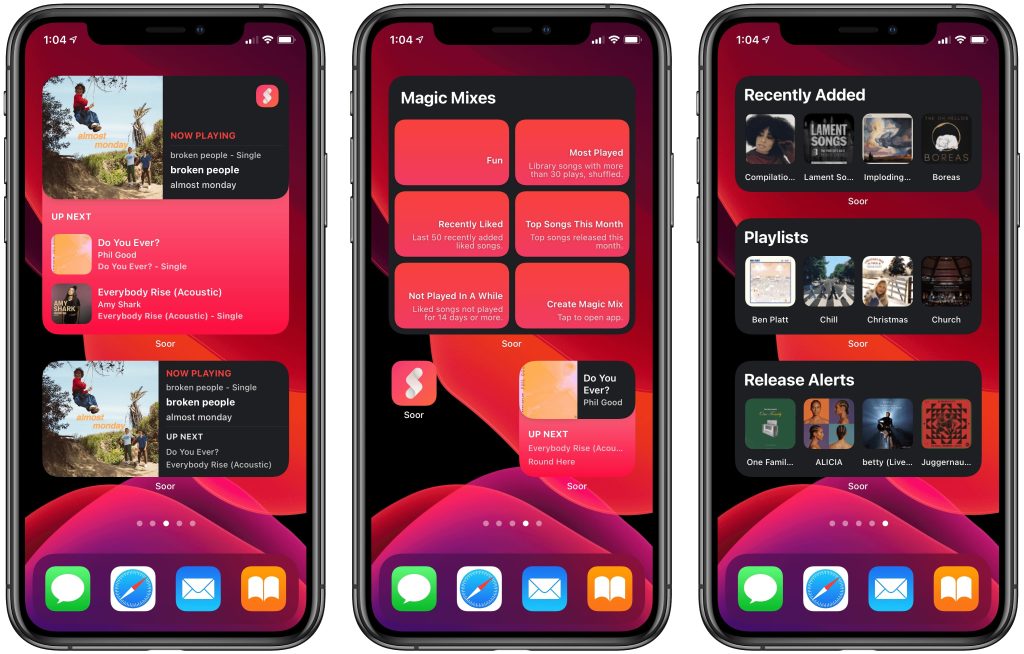
6. Customizing Widgets:
- Access Widgets: Swipe right on the home screen to access the Today View, which displays your widgets. Alternatively, press and hold on to the home screen, tap the “+” icon in the top-left corner, and select a widget to add it directly to the home screen.
- Widget Sizes: Widgets come in different sizes—small, medium, and large. When adding a widget, you can choose the size that best suits your needs and available space on the home screen.
- Add Widgets: To add a widget to the home screen, tap the “+” icon in the top-left corner of the Today View or press and hold on the home screen, then tap the “+” icon. Browse through the available widgets or use the search bar to find specific ones.
- Widget Stack: iOS 14 introduced Widget Stacks, allowing you to stack multiple widgets of the same size together. To create a stack, drag one widget on top of another. You can swipe up or down on the stack to view different widgets.
- Edit Widgets: To customize a widget, press and hold on to it, then select “Edit Widget” from the pop-up menu. This opens the widget editing interface, where you can configure its settings, choose the display mode, or change the content it shows.
- Reorder Widgets: To rearrange widgets on the home screen or within a stack, press and hold on to a widget, then drag it to the desired location. You can also reorder widgets by entering the “wiggle” mode, where you can move them freely.
- Remove Widgets: To remove a widget from the home screen or a stack, enter the “wiggle” mode by pressing and holding on a widget, then tap the “-” icon in the top-left corner of the widget. Confirm the removal if prompted.
- Smart Stack: The Smart Stack is a dynamic widget stack that intelligently displays relevant widgets based on the time of day, your usage patterns, and Siri suggestions. You can add a Smart Stack from the widget gallery or customize an existing stack.
- Widget Personalization: Some widgets, like the Weather or Calendar widget, offer personalization options. To customize these widgets, press and hold on to them, then select “Edit Widget” to access their specific customization settings.
- Third-Party Widgets: Many apps now offer their own widgets, providing additional customization options. Check the App Store for apps that support widgets and add them to your home screen for quick access to their content.
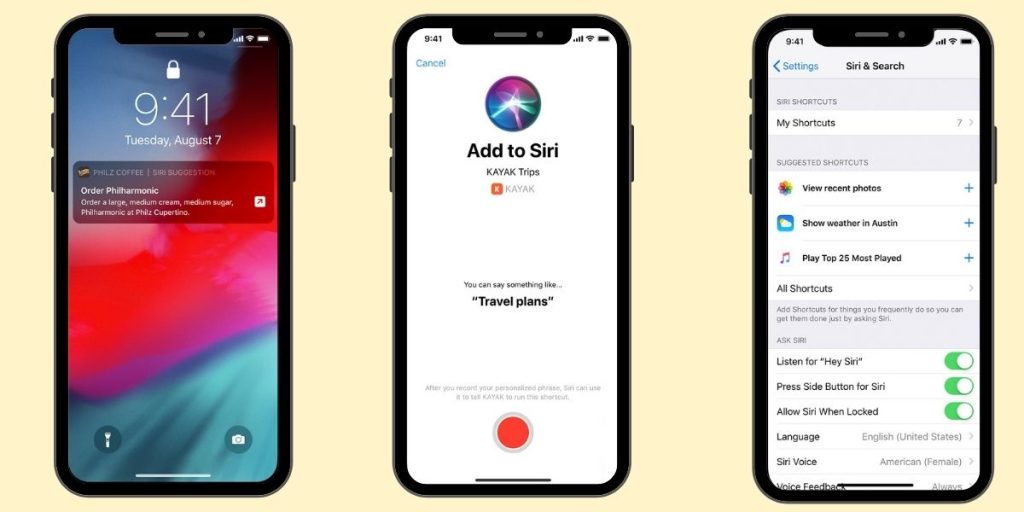
7. Siri Shortcuts:
- Introduction to Siri Shortcuts: Siri Shortcuts allow you to create custom voice commands or automate tasks on your iPhone. You can combine actions from different apps to create powerful workflows.
- Accessing Siri Shortcuts: Open the Shortcuts app on your iPhone. If it’s not pre-installed, you can download it from the App Store. Alternatively, you can access Siri Shortcuts through the Settings app.
- Pre-installed Shortcuts: The Shortcuts app comes with pre-installed shortcuts that you can use or customize. These include actions like sending a message to a specific contact, playing music, or getting directions home.
- Creating Your Own Shortcuts: To create your own custom Siri Shortcut, tap the “+” icon in the Shortcuts app. Choose actions from different apps and set up parameters to create your desired workflow.
- Running Shortcuts: You can run shortcuts by opening the Shortcuts app and tapping on the desired shortcut. Additionally, you can use Siri voice commands to trigger your shortcuts. Assign custom phrases to your shortcuts for easy activation.
- Importing and Sharing Shortcuts: You can import and share shortcuts created by others. Look for shared shortcuts online, in the Shortcuts Gallery, or from friends. Tap on a shared shortcut link to add it to your Shortcuts app.
- Automating Shortcuts: Shortcuts can be automated based on specific triggers or conditions. Use the Automation tab in the Shortcuts app to set up triggers like time of day, location, or connecting to a specific Wi-Fi network.
- Widgets and Siri Suggestions: Shortcuts can be added to your home screen as widgets or suggested by Siri based on your usage patterns. These provide quick access to frequently used shortcuts.
- Advanced Actions and Parameters: Shortcuts support advanced actions and parameters to further customize your workflows. Explore the different options available in the Shortcuts app to create more complex and personalized shortcuts.
- Third-Party App Integration: Many third-party apps support Siri Shortcuts, allowing you to integrate their functionality into your shortcuts. Look for apps with Siri Shortcuts support and explore the actions they offer.
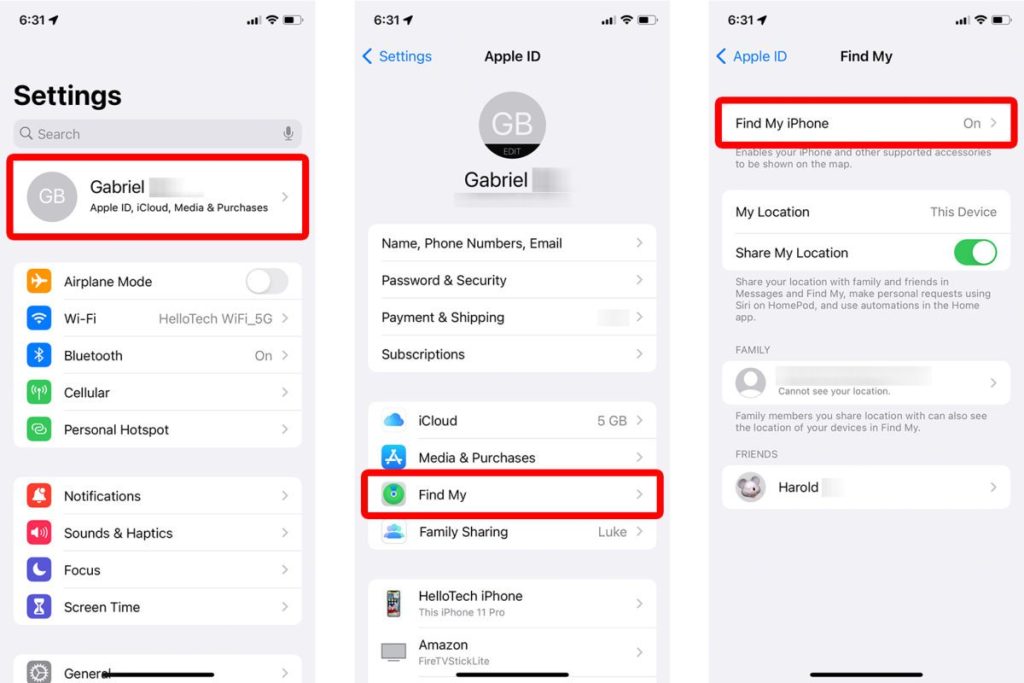
8. Utilizing Find MY:
- Find My App: Locate and open the Find My app on your iPhone. This app combines the functionality of Find My iPhone and Find My Friends into one convenient interface.
- Locating Devices: Use Find My to locate your iPhone, iPad, Mac, or even AirPods if they’re connected to your Apple ID. Tap on the “Devices” tab to see a list of your devices and their current location.
- Activating Lost Mode: If your iPhone is lost or stolen, activate Lost Mode through Find My. This locks your device remotely, displays a custom message on the screen, and enables location tracking to help recover it.
- Play Sound: If you’ve misplaced your iPhone nearby, you can use Find My to make your device emit a loud sound, even if it’s on silent mode. This feature can help you locate your iPhone if it’s within hearing range.
- Erase Data: In extreme cases where you cannot retrieve your lost device, Find My allows you to remotely erase all data to protect your personal information. This is irreversible, so only use it as a last resort.
- Sharing Location: Find My enables you to share your location with friends, family, or specific contacts. You can set up temporary sharing or choose to share your location indefinitely.
- Location Notifications: Set up notifications to receive alerts when a family member arrives or leaves a specific location. This feature is particularly useful for keeping track of loved ones’ movements.
- AirTag Integration: If you have AirTags, Find My integrates with them to help you locate your belongings. Attach an AirTag to an item and use the Find My app to track its location.
- Offline Device Tracking: Find My utilizes a network of Apple devices to help locate offline devices. If your lost iPhone is turned off or not connected to the internet, it can still broadcast a Bluetooth signal that nearby Apple devices can pick up and relay its location.
- Activation Lock: Find My includes Activation Lock, which prevents others from using your iPhone if it’s lost or stolen. Activation Lock requires your Apple ID and password to unlock and use the device.
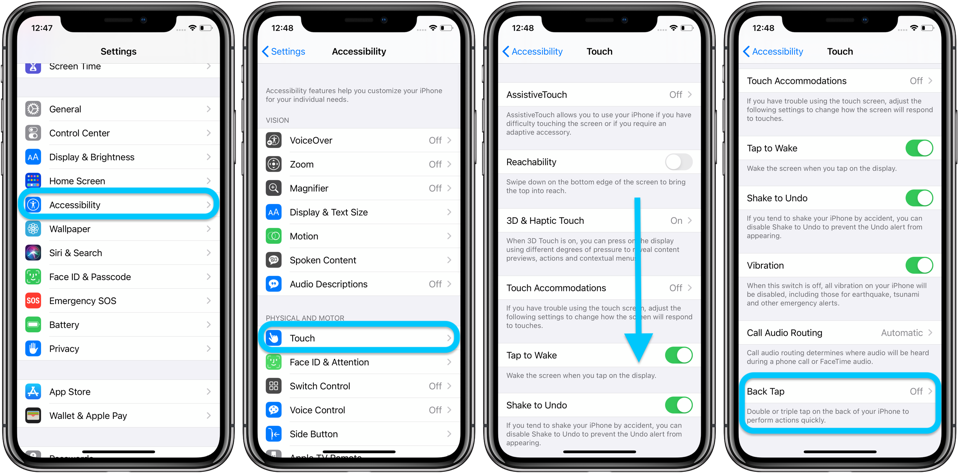
9. Back Tap Feature:
- Accessibility Feature: Back Tap is an accessibility feature available on iPhone models running iOS 14 and above. It allows you to perform actions by tapping the back of your iPhone.
- Activating Back Tap: To activate Back Tap, go to Settings > Accessibility > Touch > Back Tap. From there, you can choose between Double Tap and Triple Tap to assign actions to the back taps.
- Assigning Actions: Once you’ve selected either Double Tap or Triple Tap, you can assign an action to it. There are various options available, including launching Siri, taking a screenshot, adjusting volume, enabling accessibility features, and more.
- Custom Shortcuts: With Back Tap, you can also create custom shortcuts using the Shortcuts app. This allows you to perform complex tasks or automate actions with a simple back tap.
- Accessibility Customization: Back Tap can be especially helpful for individuals with physical disabilities or limited mobility, as it provides an alternative input method for performing actions on the iPhone.
- Quick Access to Features: Back Tap offers a convenient way to access certain features or perform common tasks without needing to navigate through menus or use physical buttons.
- Systemwide Functionality: Back Tap works across the entire operating system, so you can use it in any app or on the home screen to trigger assigned actions.
- Sensitivity Settings: You can adjust the sensitivity of the Back Tap to make it more or less responsive to taps. Higher sensitivity may trigger the action with lighter taps, while lower sensitivity requires firmer taps.
- Combining Actions: If you assign different actions to Double Tap and Triple Tap, you can use both taps for different purposes, increasing the range of actions you can perform with Back Tap.
- Experiment and Discover: With Back Tap, you have the flexibility to experiment and discover which actions work best for your needs. Try different combinations and actions to find the most useful ones for your daily use.
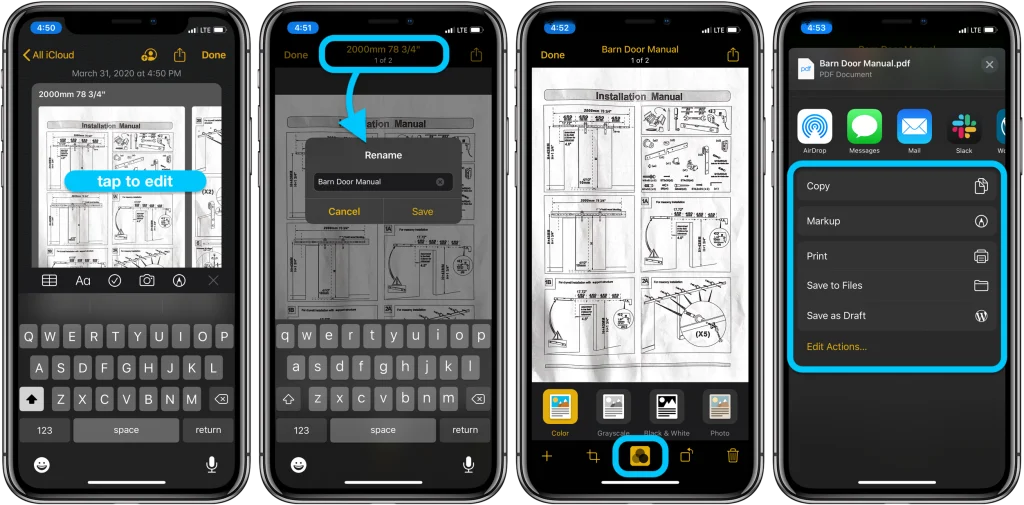
10. Scan Documents with the Notes App
- Open Notes: Locate the Notes app on your iPhone’s home screen and tap to open it.
- Create a New Note: Tap the “+” icon at the bottom of the screen to create a new note.
- Access Scanning Feature: Tap the camera icon above the keyboard in the note. A menu will appear with different options.
- Select Scan Documents: From the menu, select “Scan Documents” to activate the scanning feature.
- Align Document: Hold your iPhone above the document you want to scan. The app will automatically detect the edges of the document and highlight them with a yellow outline.
- Adjust Corners and Edges: If needed, drag the yellow corners to adjust the edges of the document. Make sure the document is fully within the outlined area.
- Capture the Scan: Tap the shutter button (circle icon) to capture the scan. You can add multiple pages to the same document by tapping the “+” button before each capture.
- Review and Crop: After capturing the scan, you’ll see a preview of it. If necessary, use the crop tool to remove any unwanted edges or portions of the document.
- Save or Continue Scanning: Tap “Save” if you’re done scanning the document, or tap the “+” button to capture additional pages and continue scanning.
- Annotate or Share: Once you’ve finished scanning and saving the document, you can annotate it with text, drawings, or shapes within the Notes app. You can also share the document by tapping the share button and selecting your preferred method, such as email or messaging.
Remember, the iPhone‘s software and features are constantly evolving, so keep an eye out for new updates and explore the settings and menus to discover even more hidden gems. Enjoy uncovering the full potential of your iPhone!
You may also like: